

How long damp proofing takes depends on the cause, the area affected and the work required. Treatment is only one part of the timeline: drying and making good can continue afterwards, so there is no single duration for every property.
It’s natural to want to know how long rooms will be disrupted and whether the damp may return. A sound damp proofing plan starts by identifying the source of moisture. Rising damp and water entering through a cavity wall need different approaches, affecting both the work and the time needed afterwards.
This guide explains what affects the timeline, how treatments for rising damp and cavity wall damp work, and what can help reduce the risk of damp returning. It also covers drying, repairs and factors to consider before choosing a treatment.
Key Takeaways
- Plan for treatment and drying as separate stages; the cause, affected area and repairs all shape the overall timeline.
- Identify where moisture is coming from before choosing a remedy, as misdiagnosis can lead to unnecessary work and redecoration.
- Rising damp and cavity wall damp follow different routes, so the treatment needs to address the source rather than just the visible marks.
- Understand how a damp proof membrane manages moisture, and why its role depends on the building and the problem being treated.
- Reduce the chance of a repeat problem by addressing the underlying cause, not simply covering stains or mould.
How long does damp proofing take?
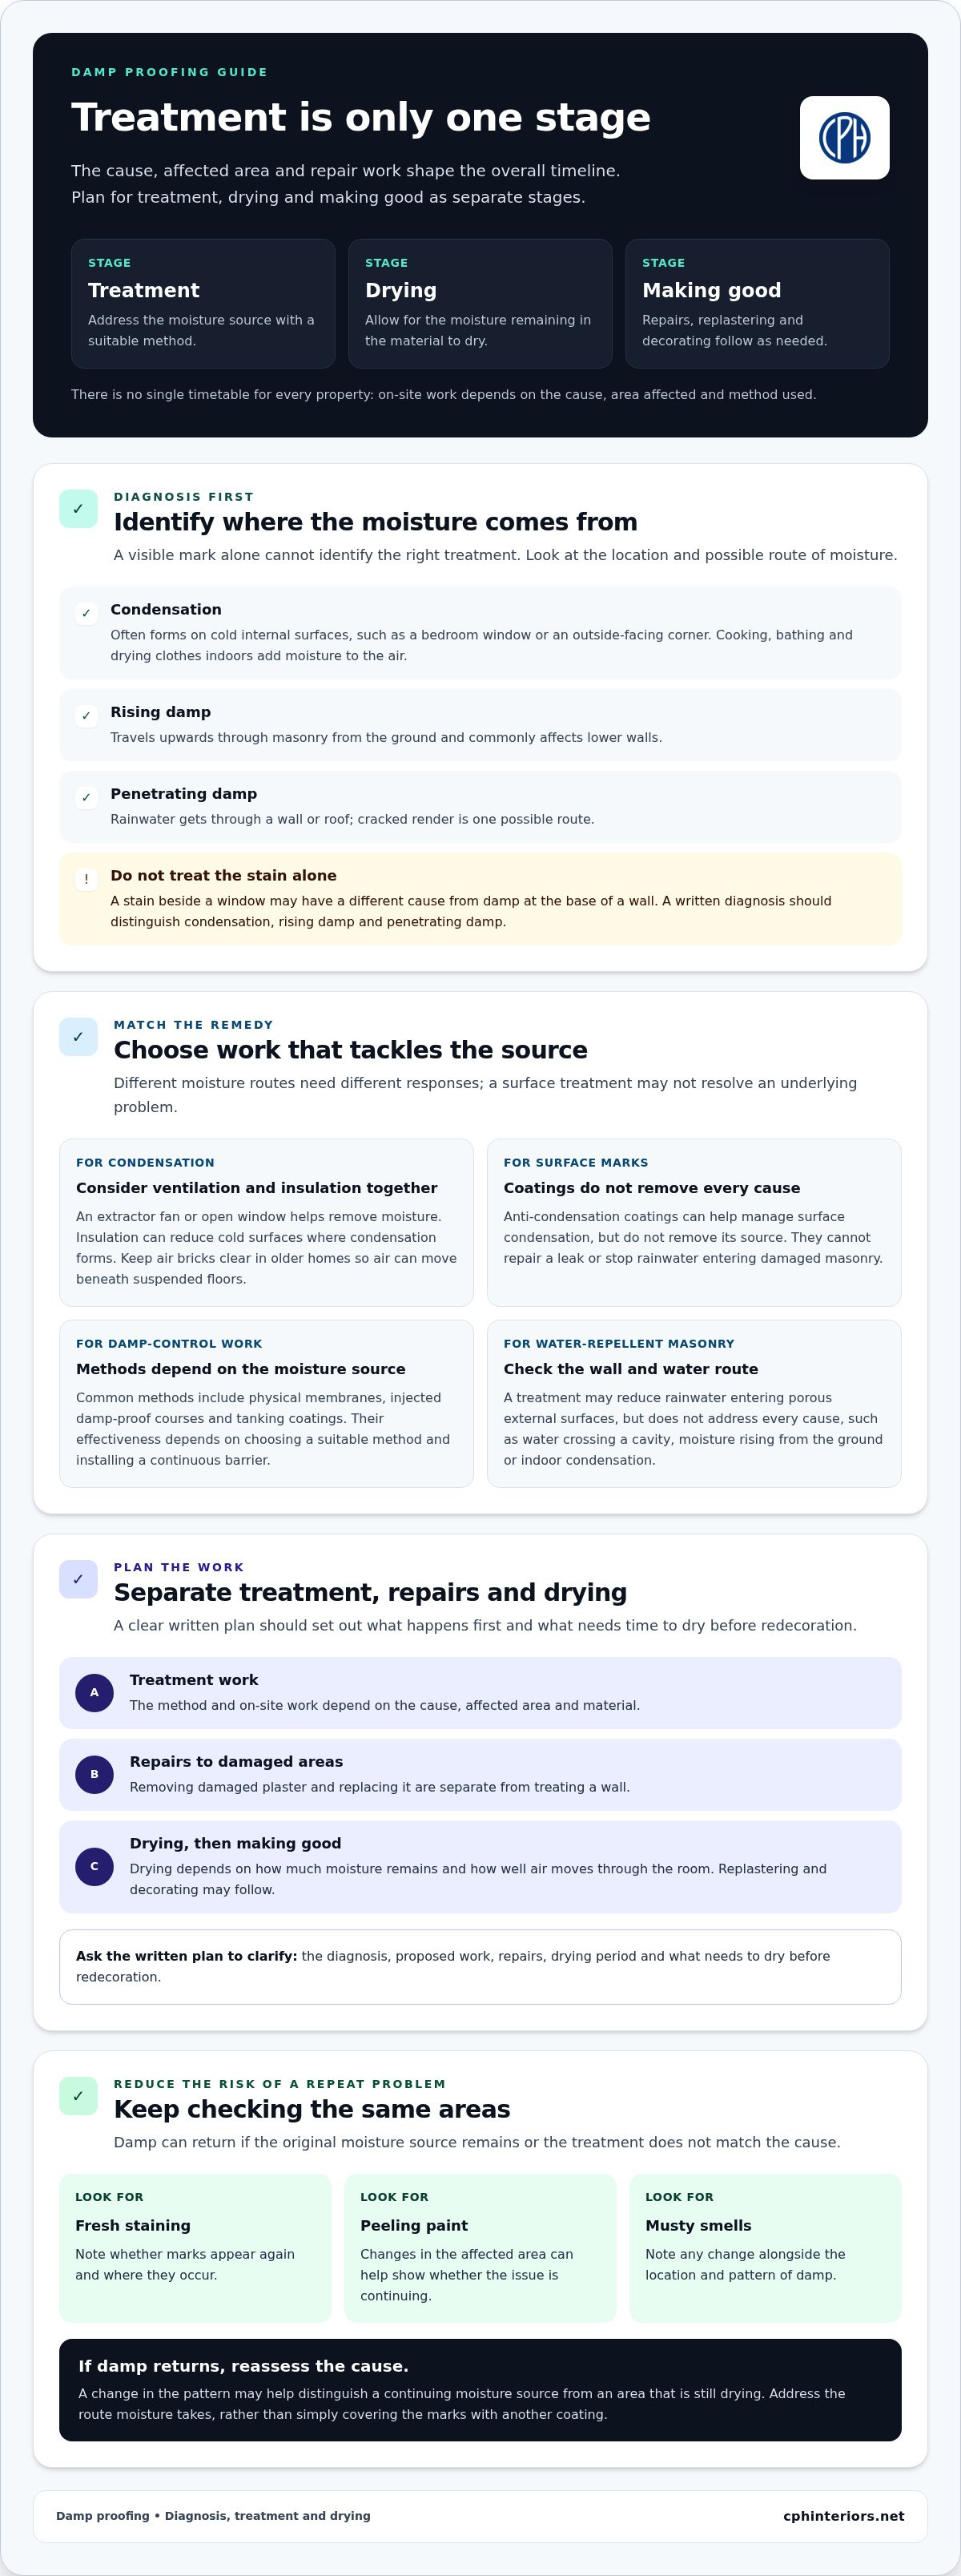
There’s no single timetable for damp proofing in a UK home. On-site work depends on the cause, the area affected and the method used. Drying, replastering and decorating are separate stages, and may take longer than the treatment itself. For example, injecting a wall is one stage; removing damaged plaster and allowing the wall to dry are others. A clear plan should set out the treatment, repairs and drying period separately.
Diagnosis shapes the schedule. Condensation often forms on cold internal surfaces, such as a bedroom window or an outside-facing corner. Rising damp travels upwards through masonry from the ground and commonly affects lower walls. Penetrating damp occurs when rainwater gets through walls or a roof; cracked render is one possible route. A visible mark alone cannot identify the right treatment, so damp proofing should start by finding the source of moisture.
For condensation, consider ventilation and insulation together. Cooking, bathing and drying clothes indoors add moisture to the air. An extractor fan or open window helps remove it, while insulation can reduce the cold surfaces where condensation forms. Keep air bricks clear in older homes so air can move beneath suspended floors. The right combination depends on where moisture builds up and how air moves through the rooms.
Anti-condensation coatings can help manage surface condensation, but they don’t remove its source. If a bathroom wall stays wet after showers, improving extraction and airflow tackles the cause more directly than painting over marks. A coating cannot repair a leak or stop rainwater entering through damaged masonry. Opening windows alone may not solve the problem either. Damp proofing work and drying time depend on matching the remedy to the cause.
Choose a specialist who provides a written diagnosis, details of the proposed work and an explanation of what happens next. A sound assessment distinguishes condensation, rising damp and penetrating damp, rather than recommending injection for every damp wall.
For serious damp and mould hazards in rented homes, the UK Government connects landlords’ responsibility with the Housing Act 2004 and the Housing Health and Safety Rating System (HHSRS). These duties concern addressing hazards. Any workmanship guarantee is separate, so read its written terms for the work covered and any conditions.
If you’re buying, note signs of damp during the survey process and establish whether the source and required work are understood before deciding. If you’re renting, report damp and mould to your landlord or managing agent. Record where it appears, such as around a window or at the base of a wall, and when you first noticed it.
Will the damp come back after treatment?
Damp can return if the original moisture source remains or the treatment doesn’t match the cause. Start with an accurate diagnosis, then choose work that addresses the route moisture takes through the building. A damp proofing plan is more likely to resolve the problem when it tackles the source, not just the visible mark.
Diagnosis and treatment outcomes
A damp diagnosis identifies the source of moisture before deciding which treatment suits the property. A proper survey considers rising and penetrating damp, internal and external walls, moist air, ventilation, cold surfaces and existing damp-control measures. This matters because a stain beside a window may have a different cause from damp at the base of a wall, and each needs a different response.
Water-repellent masonry treatments can reduce rainwater entering porous external surfaces. They won’t address every cause: water crossing a cavity, moisture rising from the ground or condensation indoors each needs a different remedy. If the wall remains damp after a surface treatment, the source may still be untreated. The material, wall construction and route moisture takes all affect whether the treatment is suitable.
After the work, keep an eye on the same areas and note any fresh staining, peeling paint or musty smell. A change in the pattern can help distinguish a continuing moisture source from an area that is still drying. If damp returns, reassess the cause rather than simply applying another coating. Arrange an assessment of the damp problem if you need help understanding the next step.
Treatment duration and related cover
Treatment time depends on the method, the affected material and the repairs that follow. Treating a wall and replacing damaged plaster, for example, are separate stages. Drying also depends on how much moisture remains and how well air moves through the room. A written plan should clarify what happens first and what needs to dry before redecoration.
Home insurance in the UK generally doesn’t cover damp proofing, so check your policy wording before relying on it to cover treatment costs. Woodworm treatment is separate: it addresses insect damage to timber, not the source of damp. If a survey finds damp and damaged floorboards, address the moisture as well as any confirmed woodworm activity. Treating only the timber won’t prevent further damage if moisture continues to reach the area. Suitable damp proofing must tackle that route.
Damp proof membranes
Common methods include physical membranes, injected damp-proof courses and tanking coatings. Their effectiveness depends on matching the method to the moisture source and installing a continuous barrier.
A damp-proof membrane is a layer that limits moisture passing from masonry or the ground into a room. In a basement, it may be fixed to walls and floors before a new internal finish is fitted. It manages moisture at the surface, but doesn’t repair an external leak or stop water entering through a damaged pipe.
Continuity matters. A gap at a floor edge, service pipe or wall joint can let moisture pass behind the membrane. For example, a basement floor membrane needs suitable connections to adjoining wall protection. Where the membrane sits behind plaster or another finish, the details at corners and openings affect how well the barrier performs.
Membranes differ from tanking. Tanking uses a waterproof coating or slurry applied directly to masonry; a membrane creates a separate layer. If tanking slurry is used, the guide calls for a minimum 10 mm cement-based render over it before a dot-and-dab or direct-plaster finish. It also recommends two coats, applied approximately 4-8 hours apart.
For a basement intended as habitable space, BS 8102:2022 recommends at least two forms of protection. This reflects the need to consider how water may enter and how the room will be used, rather than relying on one barrier in every situation. Membrane selection and installation details should suit the building’s construction and exposure to water.
Integral damp proofing works differently. Rather than adding a sheet to the finished face, water-resistant materials or additives are incorporated into the construction material. This can be part of a new build or a specified repair, but it won’t make crumbling plaster sound or correct a moisture route that bypasses the treated material. The barrier’s position matters.
Before choosing a method, establish whether the problem affects a basement, a ground-floor wall or a particular junction. A damp-proof course controls moisture rising through masonry; a basement membrane or coating addresses moisture entering below ground. Condensation needs a different response because it forms on cold internal surfaces rather than passing through the structure.
Effective protection depends on suitable preparation, continuous coverage and compatible finishes. If moisture appears beside a membrane, check joints, edges and service openings as well as the exposed wall. Replastering over a damp or damaged area without dealing with the moisture route can leave stains or crumbling finishes beneath the new surface.
Damp proofing and rising damp treatment
Rising damp occurs when moisture moves upwards from the ground through masonry. Treatment should interrupt that route and address any resulting damage.
Recognising rising damp
Capillary action draws ground moisture through tiny pathways in bricks and mortar. A damp-proof course acts as a barrier near the wall’s base, limiting that upward movement. In UK homes, rising damp typically affects ground-floor walls up to about 1 metre high. Its signs can resemble other moisture problems, so the wall pattern alone cannot confirm the source.
Look for peeling wallpaper, discoloured patches, salt-stained or crumbling plaster, and decayed skirting boards. Timber floors may also show decay where persistent moisture reaches them. Some very old UK houses, built before about 1875, may have no damp-proof course. However, a missing or damaged barrier is only one possible explanation; external ground levels and other moisture sources also matter.
Most UK buildings have some form of damp-control material at the base. A modern course may be plastic or bitumen within a mortar joint; older properties may have slate or engineering bricks. The course is typically about 150 mm above ground level. If outside ground sits too high, moisture can bypass the barrier, so inspect the wall base and surrounding ground together.
Treating rising damp
A damp-proofing cream creates a chemical barrier within the mortar course. It is injected into pre-drilled holes at regular intervals along the affected wall. The method requires a suitable mortar course and accurate placement. A specialist should first establish whether rising damp is present, since injection cannot resolve condensation or rainwater entering through external masonry.
Risks include treating the wrong cause, paying for unnecessary work, and facing costly repairs or redecoration. A poorly matched treatment can leave the moisture source active, so damp patches may persist. Chemical injection also involves drilling the wall, followed by removing affected plaster and restoring the surface.
After treatment, the usual sequence is to remove old plaster, replaster, then apply damp-proof paint once the plaster is dry. Drying time depends on the remaining moisture and wall material. Replastering too soon can trap moisture or allow salts to affect the new finish. Keep external ground below the damp-proof course to help prevent moisture bypassing the barrier.
Cavity wall damp proofing
Cavity walls have an outer leaf, an inner leaf and a gap between them. They became commonplace in UK houses built from the 1920s onwards. The cavity helps limit rain reaching the inside, but moisture can still cross if water bridges the gap or enters through damaged external masonry. Treatment depends on finding that route, not simply covering an internal mark.
Check the pattern before deciding what it means. A damp patch on an internal wall beside a chimney breast, window or external corner can have several causes. Black mould around a cold window may point to condensation, while staining after heavy rain can suggest water entering from outside. Neither sign alone proves a cavity-wall fault. The moisture’s position, timing and spread help narrow down the source.
Inspect the external wall for cracked render, damaged pointing and gaps around window frames. Cracked render can channel rainwater into a property. Also compare the outside ground level with the damp-proof course. A damp-proof course is typically about 150 mm above ground level in UK homes; raised paths or soil can let moisture bypass it. These checks help distinguish a cavity problem from water entering at the wall base.
A cavity tray helps direct water back outside where the wall construction needs one. UK building regulations require an external cavity wall gap to extend at least 225 mm below DPC level or to have a cavity tray. If moisture is visible indoors, the relevant detail is where water crosses the cavity and whether it can drain away. Tanking an internal surface may hide a symptom without correcting that route.
Diagnosis should consider the whole wall, including external render, the cavity and internal finishes. An obstruction or bridge in the cavity can allow moisture to cross, while a defect in external masonry can let rain in directly. Condensation needs a different response: ventilation and insulation may help reduce moist air and cold internal surfaces. Treating these causes as interchangeable risks leaving the original problem unresolved.
Once the source is identified, the remedy can target the affected part of the construction. That may mean repairing external defects or addressing a cavity detail, rather than applying an internal coating. Recheck the same patch after the work and note whether fresh staining follows rainfall. This helps show whether water is still entering through the external wall.
If a damp patch on an internal wall could be linked to the cavity, arrange an assessment of the damp problem to identify the likely moisture route and suitable treatment.
CPH Interiors: Damp Proofing
CPH Interiors provides damp proofing for property owners dealing with moisture problems that need a practical, targeted response. The right approach depends on the cause: rising or penetrating damp calls for different work from condensation on cold internal surfaces.
Where moisture builds up indoors, condensation control and ventilation can help manage damp air. Insulation may also help where cold surfaces contribute to condensation. These measures address different parts of the problem, so identifying the likely source helps shape a suitable plan.
If damp patches or mould keep returning, or you’re unsure which treatment fits, CPH Interiors can help you consider the next step. Contact CPH Interiors or visit CPH Interiors online to discuss your property.
Take the next step with confidence
Before arranging work, note where moisture appears and what seems to affect it. A brief record of changes after rain, cooking or bathing can make your first conversation more focused. You don’t need to diagnose the cause yourself. Explain what you’ve noticed and ask what treatment addresses it.
CPH Interiors provides damp proofing, condensation control and insulation. These services address different moisture conditions, depending on what is happening in your property. A considered approach starts with the issue you can see and works towards a practical solution, rather than covering marks without understanding their cause.
If you’re ready to discuss your property, contact CPH Interiors about damp proofing. A clear conversation can help you work out what to consider next, without rushing into a decision. With the right information in hand, you can move forward calmly.
Frequently Asked Questions
How do I know if my property has a damp problem?
Look for changes that persist or spread, rather than judging a wall by one mark. A musty smell in a closed cupboard, recurring water droplets on a window or plaster that keeps blistering can each point to excess moisture. Note the room, surface and conditions when it appears. A patch that worsens after rainfall, for example, gives different clues from one that forms after cooking.
What are the signs of damp in your house?
Common clues include mould, stained plaster, peeling wallpaper and timber that feels soft or looks damaged. Check behind furniture against outside walls, where restricted airflow can hide marks, and around window frames after cold nights. A single sign doesn’t identify the cause. Compare affected areas: mould on several cold surfaces may suggest condensation, while a localised patch can point to moisture entering at that spot.
Can I waterproof or tank a basement myself?
Basement tanking is not a straightforward decorating job. Preparation, the condition of the masonry and the junction between floor and wall all affect whether the system works. Poor preparation or unsuitable materials can contribute to failure, water damage and costly remedial work. If you’re converting a basement into living space, understand the design and moisture route before choosing a coating or membrane.
Do I need one or two types of waterproofing?
A basement intended for habitable use should have at least two forms of protection, as recommended by BS 8102:2022. The appropriate combination depends on how water could enter and how the space will be used. For example, a wall barrier and a protected floor may address separate routes. More layers are not automatically better if joints, edges or drainage details are poorly handled.
How can I prevent damp in the future?
Reduce avoidable moisture and keep airflow routes clear. Use an extractor while cooking or bathing, dry washing outdoors where practical, and avoid repeatedly drying clothes in one closed room. In older homes, make sure air bricks remain unobstructed. Address the source of any leak or recurring wet patch rather than repainting over it, then watch the same area for changes after wet weather.
What is damp proofing and what types of damp affect UK homes?
Damp proofing means measures that limit moisture entering or travelling through a building. UK homes can be affected by rising damp from the ground, penetrating damp from rain passing through external walls or roofs, and condensation when moist indoor air meets cold surfaces. Each follows a different route. The distinction matters because a barrier for ground moisture won’t remove water vapour produced indoors.
How can you identify rising damp, penetrating damp and condensation?
Use location and timing as clues, not as a diagnosis. Rising damp is associated with the lower part of ground-floor walls. Penetrating damp may appear on an internal wall after rain, especially near damaged external masonry. Condensation often forms on cold windows or corners after bathing, cooking or drying clothes. Record when marks appear and whether weather or household activity makes a difference.
Can you treat damp yourself, and which fixes are suitable for DIY?
Simple moisture-control habits are useful for everyday prevention: use extractor fans, ventilate rooms and keep air bricks clear. Painting over mould or applying a water-repellent coating won’t fix a leak, a cavity problem or moisture rising through masonry. Avoid drilling walls for an injected course or tanking a basement without understanding its construction. In South Wales, Bristol and Devon, CPH Interiors provides damp proofing and condensation control to help properties tackle moisture at its source.